
Creating a Source Filter using Upload Data File
5 July, 2011
When using source filters, this option of data entry allows you to upload a CSV file that contains the filter entries. Using a CSV has many benefits, as this allows you to easily manage and maintain the filter entries. Values can be easily changed and removed, then re-uploaded.
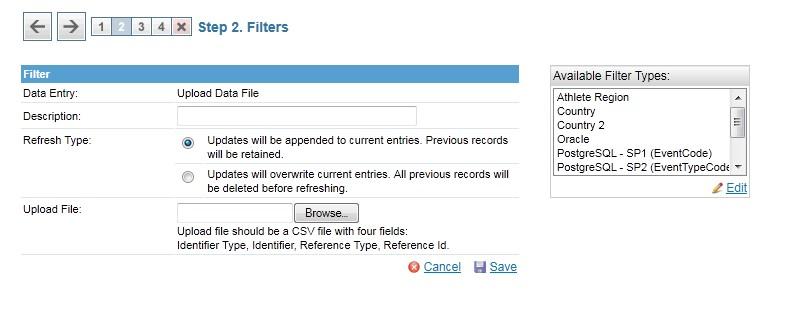
Click on the 'Browse' button to open the CSV file containing the filter records.
The file must consist of records of the four fields listed above. The file may contain a header row, which must have the titles ?Identifier Type?, ?Identifier?, ?Reference Type? and ?Reference Id?.
Identifier Type = [color="#E81212">EMAIL or USERID [/color]
Identifier = [color="#E81212">Clients email address / UserId [/color]
Reference Type = [color="#E81212">Source Filter Code (Not name)[/color]
Reference Id = [color="#E81212">Source Filter value [/color]
e.g.
'Refresh Type' controls how to treat new records , choosing ?overwrite all current entries?, will simply overwrite all existing entries and upload all entries from the CSV file.
Choosing ?append to current entries?, will only add new records from the CSV file.
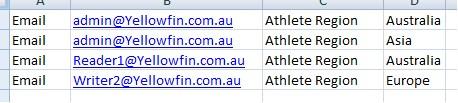
You can see in the above CSV file, there are 4 records saved against the source filter. If I then upload the following CSV file (note AustraliaZ):
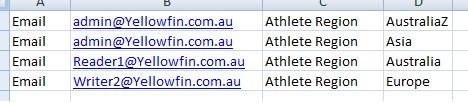
Choosing?append to current entries? will add 1 more entry to the existing 4.
It will only upload the entry ?admin@Yellowfin.com.au? ? ?AustraliaZ? to the source filter entry.
Choosing?overwrite all current entries? will overwrite all existing entries, which means the above 4 will be uploaded, and all previous entries will be erased.
Related posts:
- Source/Access Filters Guide
- Setting up a source/access filter on the data source
- Applying the source/access filter to a view
- Applying the source/access filter to a report
- Tutorial: Setting up a new source filter with the Ski-Team database